Documentation This documentation applies only to iceScrum v7.
For old iceScrum R6, read the documentation or migrate.
Access all the iceScrum capabilities through its REST web services API
API endpoints (Swagger)
The API endpoints are documented with the OpenAPI 3.0 specification used in Swagger.
You can access the documentation of the latest iceScrum version here: https://www.icescrum.com/api.
If you use your own server (on-premise), then append /api to its URL to read the corresponding documentation.
Authentication
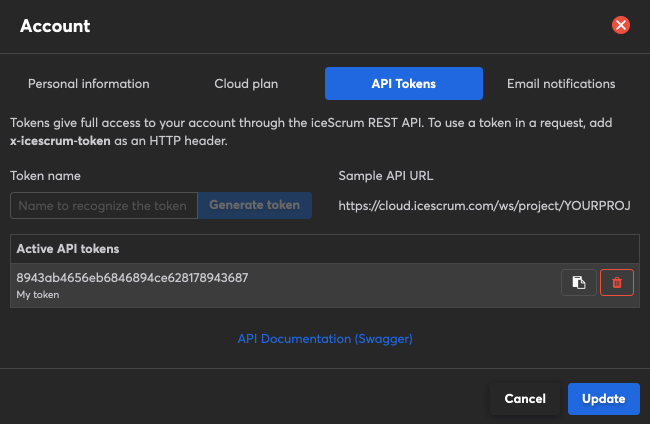
All API calls require authentication. The first step consists in generating a token by opening the corresponding tab in your profile. Give your token a name in order to recognize it.

Tokens give full access to your account through the iceScrum API. To use a token to authenticate a request, add the x-icescrum-token HTTP header.
x-icescrum-token: bezfjoqspo54zefzefe845e58sf
For compatibility with external services, aliases can also be used: x-gitlab-token, x-auth-token. If you cannot control the HTTP header, you can provide the token using icescrum-token query parameter in the URL, however this is less secure and should be avoided if possible.
Permissions
When using an authentication token that belongs to a user, you get all the permissions of this user.
Thus, performing an action through the API requires the same role as it would in the UI (e.g. Product Owner, Administrator…). That means that depending on what you need to do you may need to switch users or adjust the roles (see the roles and permissions documentation).
Similarly, like in the UI some actions will be available only if you enable the corresponding App or if items have a specific state.
Data format
Most iceScrum endpoints produce JSON so you must set the Accept HTTP request header to application/json.
Here is a sample of JSON data returned by iceScrum:
{
    "class": "Story",
    "id": 23,
    "acceptanceTests_count": 2,
    "acceptedDate": "2017-08-20T00:00:00Z",
    "activities_count": 2,
    "actor": null,
    "affectVersion": null,
    "backlog": {
        "class": "TimeBox",
        "id": 1
    },
    "creator": {
        "class": "User",
        "id": 2,
        "firstName": "Roberto",
        "lastName": "Doe"
    },
    "dateCreated": "2017-09-04T13:22:24Z",
    "dependsOn": null,
    "description": "",
    "doneDate": null,
    "effort": null,
    "estimatedDate": null,
    "feature": {
        "class": "Feature",
        "id": 4,
        "color": "#a0dffa",
        "name": "Search"
    },
    "followers_count": 1,
    "inProgressDate": null,
    "lastUpdated": "2017-09-04T13:22:32Z",
    "name": "Search by physical characteristics",
    "notes": "",
    "origin": null,
    "parentSprint": null,
    "plannedDate": null,
    "rank": 6,
    "state": 2,
    "suggestedDate": "2017-08-19T00:00:00Z",
    "tasks_count": 0,
    "todoDate": "2017-09-04T13:22:24Z",
    "type": 0,
    "uid": 23,
    "value": 0,
    "voters_count": 0,
    "testState": 1,
    "tags": [],
    "dependences": [],
    "followed": true,
    "countDoneTasks": 0,
    "comments_count": 0,
    "attachments_count": 0,
    "commits_count": 0,
    "builds_count": 0,
    "hasVotedFor": false,
    "notes_html": ""
}
If you send data to iceScrum, also add the Content-Type header to application/json and provide your JSON data as the HTTP request body.
There is a difference between the data you receive and the data you send to iceScrum: you must surround any item by an object with the item type in camel case (starting with a lower-case letter) as a key. For example, to create a story set the following as your request body:
{
    "story": {
        "name": "this is a test"
    }
}
Some enumerated fields such as story types are represented as numbers. The correspondance between the types and the associated numbers is provided in the Swagger Schemas.
More details regarding what you can send and receive for each endpoint can be found in the Swagger documentation.
URLs
All URLs starts by the URL of your iceScrum server followed by /ws/
http://iceScrumServer/ws/...
A sample URL adapted to your server is provided where you create tokens in iceScrum.
Variable parts of the URLs described in the Swagger documentation are surrounded by curly brackets. You need to replace them with the actual values you manipulate.
Examples
Here are examples of API calls using the cURL command line tool:
curl -H "Accept: application/json"                         \
     -H "x-icescrum-token: ab4565465e8aa53bfe57a4587"      \
     https://cloud.icescrum.com/ws/project/MYPROJ/story
curl -H "Accept: application/json"                         \
     -H "x-icescrum-token: ab4565465e8aa53bfe57a4587"      \
     -H "Content-Type: application/json"                   \
     -d '{ "story": { "name": "foo" } }'                   \
     https://cloud.icescrum.com/ws/project/MYPROJ/story
curl -H "Accept: application/json"                         \
     -H "x-icescrum-token: ab4565465e8aa53bfe57a4587"      \
     -H "Content-Type: application/json"                   \
     -d '{ "task": { "name": "bar", "parentStory": { "id": 42 }, "color": "#ff1313" } }'    \
     https://cloud.icescrum.com/ws/project/MYPROJ/task
curl -H "Accept: application/json"                         \
     -H "x-icescrum-token: ab4565465e8aa53bfe57a4587"      \
     https://cloud.icescrum.com/ws/project/MYPROJ/task/story/42
Migration from R6
The main difference compared to the R6 API is authentication. Indeed, the API used to require username / password, which may be unsafe. The new API now uses tokens: in your account, you can create / revoke tokens at will and use them in API calls to authenticate yourself.
The new API capabilities should be at least equivalent, and even more powerful than before. However, URLs have been changed in order to provide a cleaner and more consistent API.
The format of payloads has been changed too to make full use of JSON objects so string nested properties should be expanded. For example, { “task.parentStory.id”: 42 } should be translated to { “task”: { “parentStory”: { “id”: 42 } } } with the new API.
The API doesn’t need to be enabled anymore, but it still requires an explicit action to be enabled since it now requires generating tokens.
Last, the XML format is no longer supported as it entailed a significant overhead while being superseded by JSON in most modern applications.